Primer design is a critical first step in the design of a quality real time PCR experiment. There are many primer design elements to consider that can help minimize troubleshooting down the line, including primer specificity, primer size and amplicon length. Read on to learn how to create specific and effective primers for several types of PCR assays including real time quantitative PCR (qPCR), reverse transcription quantitative PCR (RT-qPCR), bisulfite PCR, and methylation specific PCR (MSP).
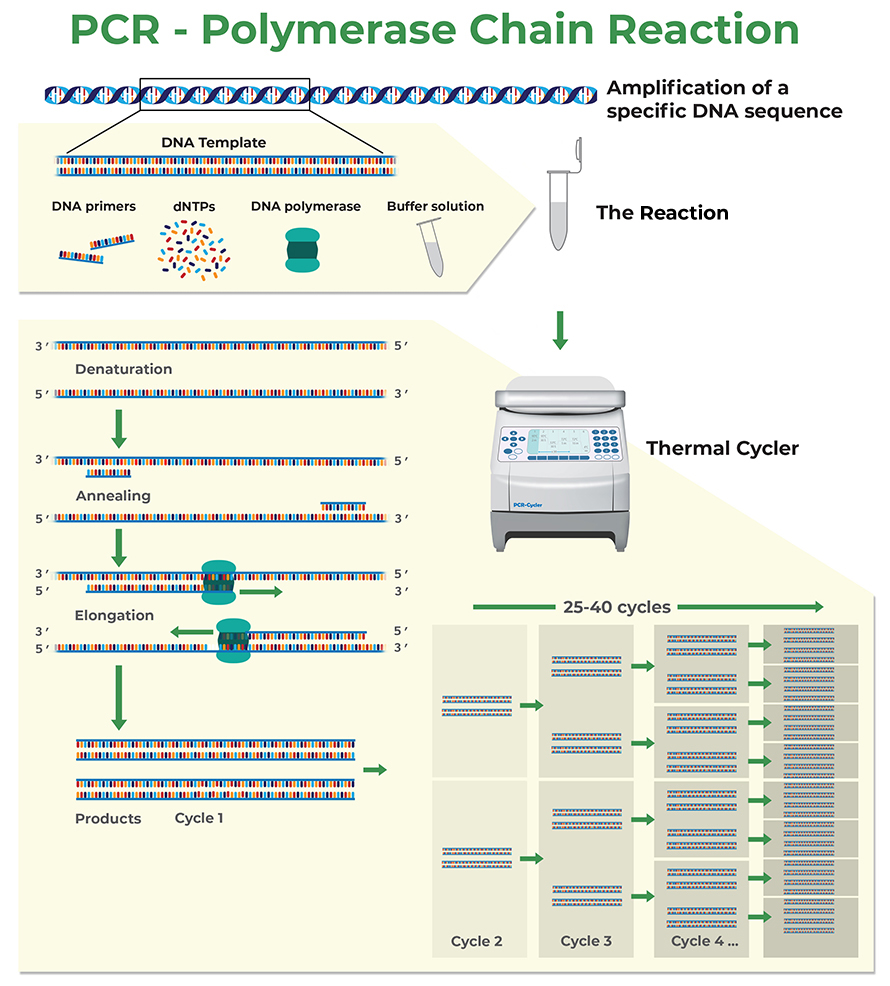
Polymerase chain reaction (PCR) is a biochemical process that uses repeated cycles of heating and cooling to amplify a genetic region of interest, called the amplicon. In each cycle the double stranded DNA is first denatured and then cooled, allowing short oligonucleotide primers to anneal to the 3’ end of each DNA strand of the amplicon. These primers are then used by the DNA polymerase to build new complementary strands, which will result in the doubling of the number of DNA molecules of the targeted DNA sequence for each PCR cycle.
While this system is incredibly useful to amplify and precisely quantify a gene of interest, there are several obstacles that can lower primer efficiencies and jeopardize your experiment. Overcoming low primer efficiency is the first step to a successful PCR, but how can you ensure your PCR product is concentrated and pure enough for downstream applications? Zymo Research’s DNA Clean & Concentrator Kits are capable of maximizing DNA concentration and removing contaminants, making your PCR product suitable for even the most sensitive downstream applications.
Here are the top recommendations for how to design primers for PCR and real time quantitative PCR (qPCR), reverse transcription quantitative PCR (RT-qPCR), bisulfite PCR, and methylation specific PCR (MSP).
How to Design Primers for PCR and Quantitative Real-Time PCR (qPCR)
Tips for Primer Design:
-
Keep the melting temperatures (Tm) of each primer pair within 2°C of one another. The Tm can be approximately calculated by the formula Tm = (A+T) x 2 + (G+C) x 4, however, more precise, and elaborate Tm calculation tools are available online. Having a similar Tm between primers ensures that the forward and reverse primers will be bound to their complementary DNA strands at the same time, reducing the chance that the primer with the highest Tm will bind to nonspecific DNA sequences.
-
Use an annealing temperature (Ta) 3-5°C below the melting temperature. The annealing temperature is the temperature at which the primers will bind to a new template strand. This needs to be lower than the Tm so that the primers can efficiently bind to the target, but not too low that the primers bind to nonspecific targets.
- Keep primers between 18-22 base pairs long. This primer length is long enough to ensure binding specificity while also short enough to keep the Tm within an appropriate range.
- Design primers with a GC content of 35-65%. A GC content between 35% and 65% without long stretches (> 4 bases) of the same nucleotide will ensure enough sequence complexity for optimal primer specificity.
- Minimize G/C repeats, especially at the 3’ end of the primer. Cytosine and guanine have stronger binding affinity than adenine and thymine and repeats of more than 4 G or C can bind to many places in the genome with high affinity. If these repeats are at the 3’ end of the primer, DNA polymerase can extend amplicons in off-target locations, which can ultimately decrease the PCR efficiency.
- Limit amplicon length to 140 base pairs. Amplicons between 70-140 base pairs are generally long enough to allow the design of two efficient primers and a probe (if a TaqMan-based assay is desired) for qPCR assays. Longer amplicons are possible, although it may be necessary to adjust the thermal cycler protocol to allow for complete elongation of the new strand. Additionally, if the sample contains heavily fragmented DNA, it is best to keep amplicons smaller to increase the likelihood of having intact target sequences for primer binding.
- Start with High Purity DNA. Successful PCR starts with high quality DNA that is free of PCR inhibitors. Zymo Research’s Quick-DNA Kits are a simple solution for the rapid isolation of total DNA from a variety of biological sample sources.
Tips for TaqMan® Probe Design:
- Keep the melting temperatures of the probe 4 to 8°C higher than the primers. For TaqMan-based qPCR assays, probes are designed to anneal to the target DNA before the primers start to elongate the strands. This will keep the signal as high as possible without compromising specificity.
- Keep the probe length between 20-25 base pairs. Probes that are slightly longer than primers will remain bound to the target throughout elongation and will likely be more specific for the targeted DNA region.
- Do not overlap probe and primer binding sites. Probes and primers with overlapping binding sites cannot be used in the same reaction.
- Avoid guanine at the 5’ end of the probe. Guanine has a quenching effect on the fluorophores attached to TaqMan probes which can dampen the signal in your reaction.
Considerations for Both Primers and Probes:
- Do not design primers or probes containing common SNPs. Check genome data to ensure that primer and probe binding sites do not contain common single nucleotide polymorphisms (SNPs). SNPs can interfere with primer or probe binding by introducing sequence variations in a subset of test samples. You can use UCSC’s Genome Browser tool to check for SNPs.
- Check oligonucleotide sequences for hairpins, self-dimers, and hetero dimers. Avoid using oligonucleotides that have strong interactions with themselves (hairpins or self-dimers) or with other oligonucleotides in the reaction mixture (hetero-dimers), especially if the interaction occurs at the 3’ end of the primer.
- Check the oligonucleotide sequences against the host genome. Primers should be specific to the target sequence of interest. To ensure specificity to the right genomic location, you can use NCBI’s BLAST tool to cross reference the primer sequence against the entire genome.
ZymoTaq DNA Polymerase makes it easy to perform hot-start qPCR while reducing primer dimers and nonspecific product formation. For more information, view our collection of ZymoTaq Polymerase products.
How to Design Primers for Quantitative Reverse Transcription PCR (RT-qPCR)
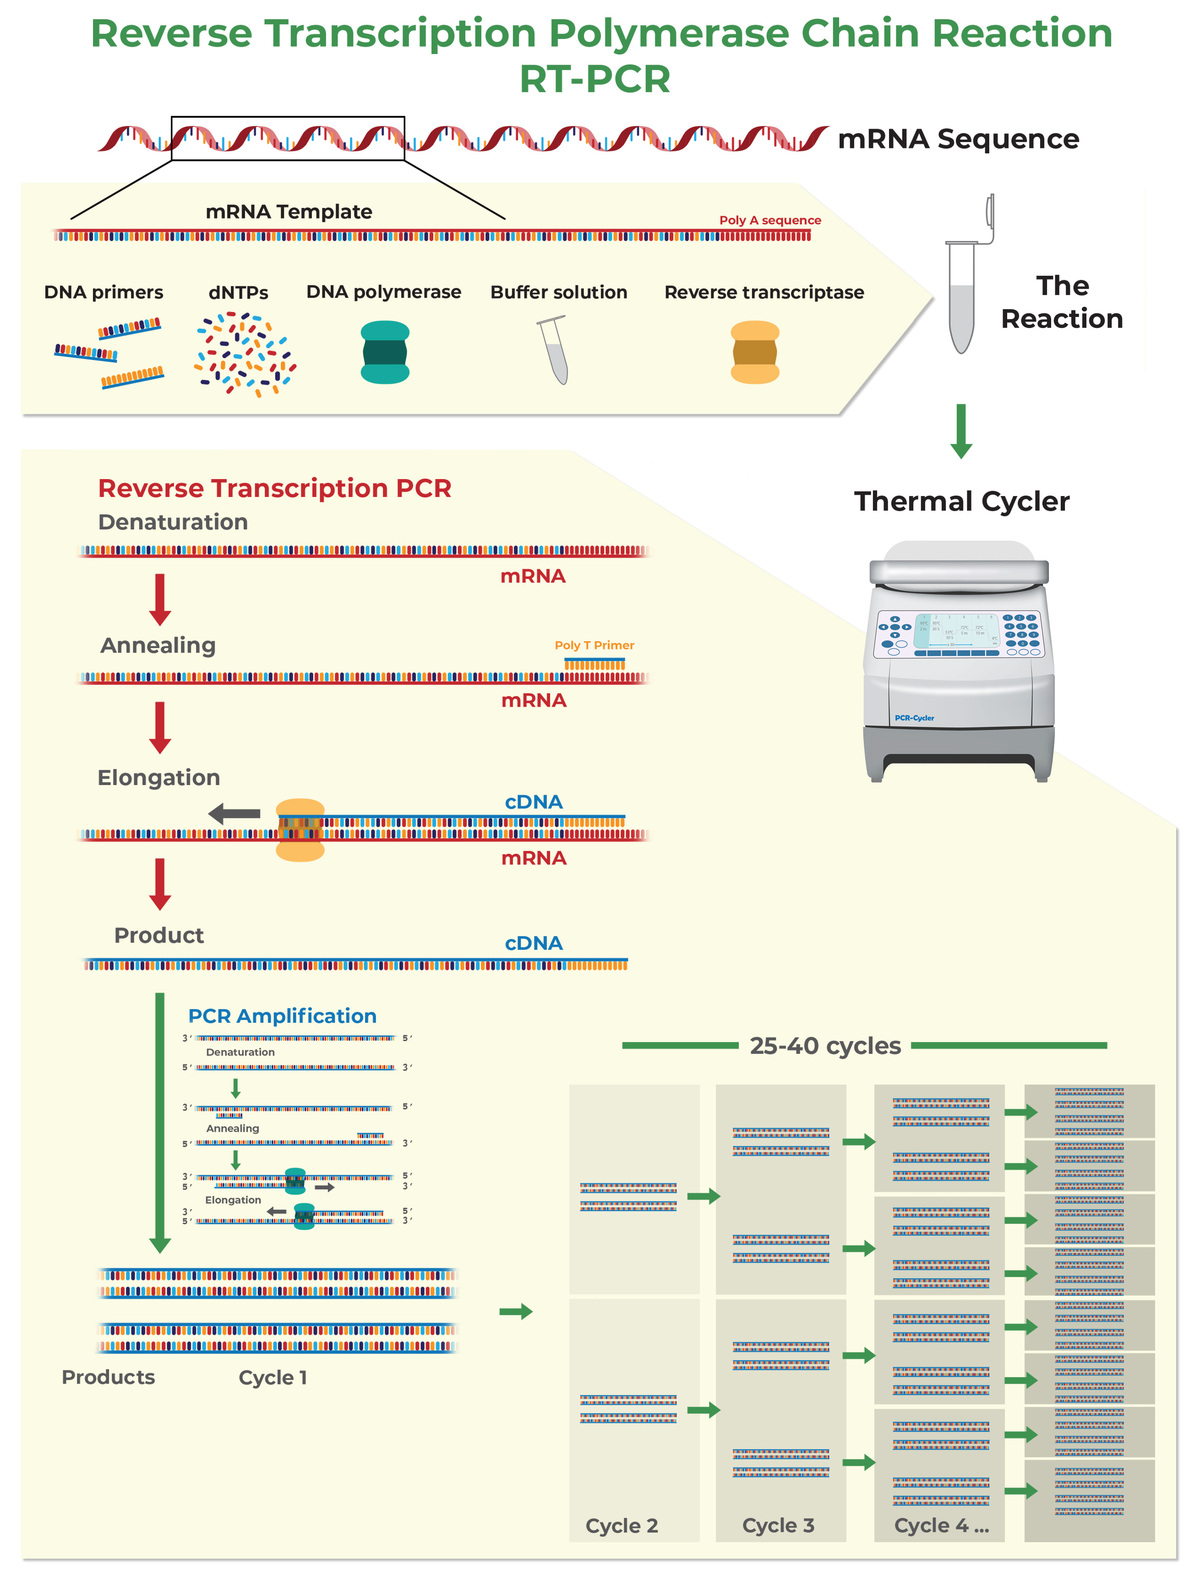
The above tips are also applicable to a slightly different form of PCR called quantitative reverse transcription PCR (RT-qPCR). RT-qPCR allows you to perform PCR starting from RNA instead of DNA. If your RNA has been stored in TRIzol® or another similar reagent, learn more about Zymo Research’s Direct-zol RNA Purification Kits. These kits are made to efficiently purify total RNA that is suitable for RT-qPCR from TRI Reagent®, eliminating the need for chloroform, phase separation or precipitation steps.
In RT-qPCR, RNA is first converted into cDNA (reverse transcription, or RT), and then amplified with PCR as described in the previous section. During maturation, RNA is subjected to splicing, which removes introns from pre-mRNA sequences. For this reason, mRNA sequences differ from genomic DNA sequences. Thanks to the splicing it is possible to design a PCR assay specific to the RNA transcript.
- Design primers over an exon-exon junction to quantify mRNA instead of gDNA. If possible, design at least one primer over an exon-exon junction to increase the reaction specificity for mRNA over gDNA (this will be useful in case genomic DNA has not been completely removed from the RNA sample). Most of the 5’ end of the primer sequence should be located on one exon leaving only 3 to 4 bases at the 3’ end in the next exon.
Zymo Research provides high-quality reagents for efficient cDNA synthesis and robust qPCR amplification that can simplify and improve your RT-qPCR workflow. Using the ZymoScript RT PreMix Kit, high yield, full-length cDNA synthesis can be achieved in less than 15 minutes. Alternatively, fast reverse transcription and highly sensitive qPCR amplification can be completed in a single reaction using the ZymoScript One-Step RT-qPCR Kit. The ZymoScript One-Step RT-qPCR Kit is compatible with both SYBR Green and TaqMan probe-based assays to allow ultimate flexibility. Both kits use blue tracking dye to simplify the reaction set-up and save time. RT-qPCR design and set-up has never been more convenient and powerful. For more information on the new ZymoScript product line, please reach out to our scientists at tech@zymoresearch.com or call (949) 679-1190 ext. 3.
How to Design Primers for Bisulfite PCR
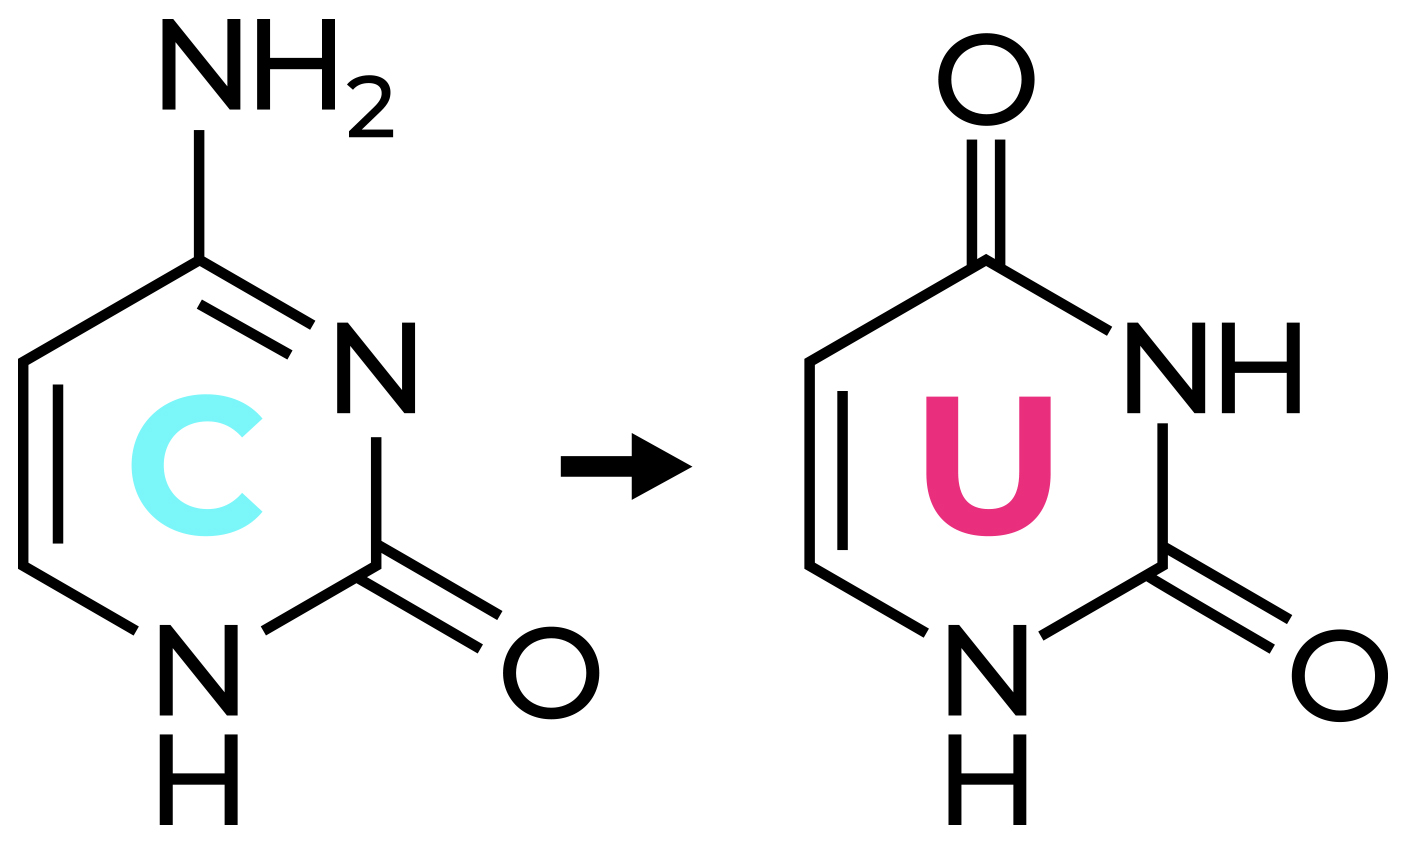
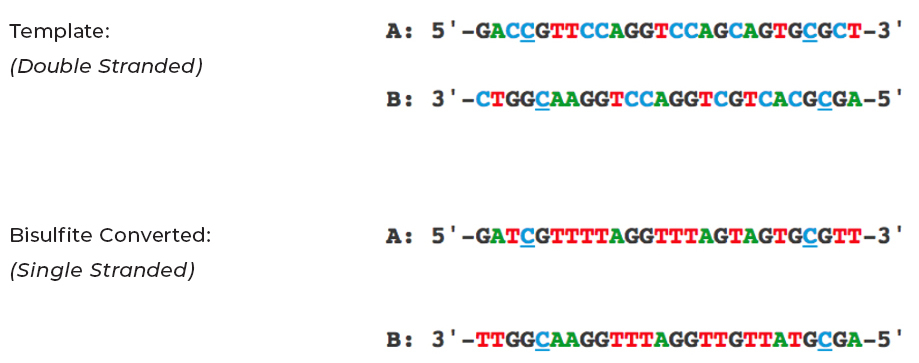
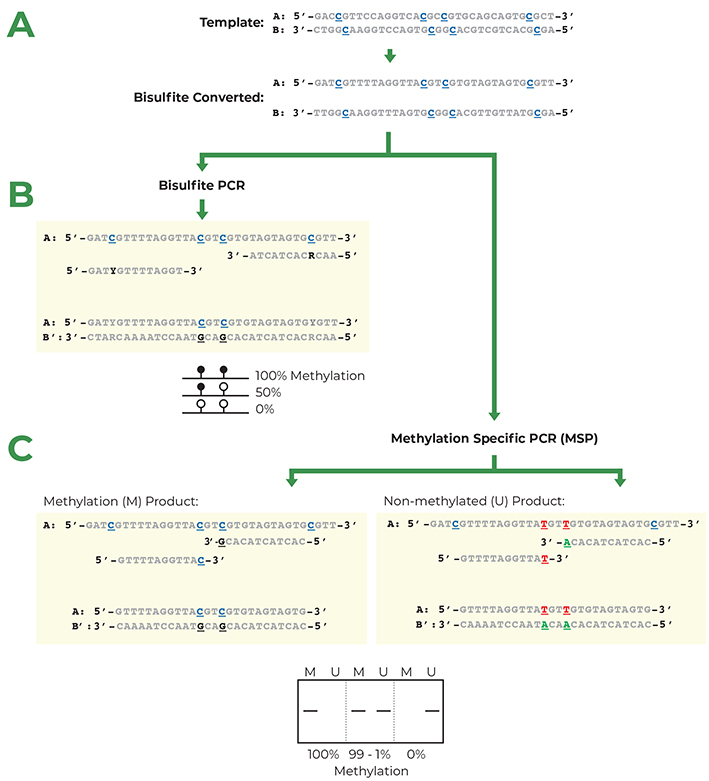
Bisulfite PCR is a multi-step process that enables users to determine the methylation status of CpG sites within a PCR amplicon. The first step in bisulfite PCR is bisulfite conversion of the DNA. Bisulfite conversion is a process that uses sodium bisulfite to convert all unmethylated cytosines in DNA to uracil. In contrast, methylated cytosines are left unaltered by the sodium bisulfite treatment. After the bisulfite conversion step, a PCR reaction is run to determine the methylation status of CpG sites located between the two primers. During this PCR, the converted uracil bases are read and amplified as thymine, while the methylated cytosines continue to be amplified as cytosine. Thus, cytosines that were methylated in the original DNA will be the only cytosines left in the DNA sequence after amplification. Based on this principle it is possible, by sequencing the bisulfite PCR product, to identify the methylation status of the cytosines in the original DNA sample. While this method is useful to learn the methylation status of DNA, the conversion of unmethylated cytosines to uracil causes the two DNA strands to lose complementarity and strongly decreases the complexity of the DNA sequence. This makes the design of primers specific for the DNA region of interest more challenging.
Tips For Bisulfite Primer Design:
- Design primers that are between 26-30 base pairs long. This will increase the chance to design a specific primer with an adequate Tm.
- Keep amplicons between 70-300 base pairs. Since bisulfite treatments tend to fragment the DNA, the amplification of long amplicons is more challenging than short amplicons. For optimal results keep the amplicon length between 70 to 300 bp.
- Avoid CpG sites in primer sequences. If it is unavoidable to include a CpG site in a primer sequence, locate it at the 5’ end of the primer and add a degenerate base (Y) complementary to the cytosine position in the opposite strand.
- Allow the reaction to run for 35 to 40 cycles. Bisulfite conversion is a harsh process that leads to DNA fragmentation and damage. Design PCR programs with at least 35 thermal cycles to compensate for DNA fragmentation.
- Use a hot start polymerase for bisulfite PCR to increase specificity. Nonspecific amplification is relatively common with bisulfite-converted DNA due to it being AT-rich. Using a hot-start polymerase and optimized primer design and protocol will help reduce nonspecific products.
- Keep annealing temperatures between 55-60°C to increase specificity.

For more on bisulfite conversion, see our Bisulfite Beginner Guide. For fast and complete bisulfite conversion of DNA and RNA for methylation analyses, see our range of bisulfite conversion kits, and ZymoTaq Polymerase collections.
How to Design Primers for Methylation Specific PCR (MSP)
Methylation Specific PCR (MSP) relies on amplification to assess the methylation status at specific CpG sites after bisulfite conversion. Success with this system depends on the differential amplification of the template using methylated (M) and non-methylated (U) primer sets. While most of the considerations for MSP primer design are identical for those for bisulfite PCR, CpG sites within the primers are treated differently. Bisulfite PCR examines the methylation status of all the CpG sites present in a specific region, while MSP assesses the methylation at a single CpG site complementary to the 3’ end of the primer sequence.
- Create M and U primer sets with CpG sites at the 3’ end. Depending on the location of the CpG sites on the original sense or anti-sense DNA strands, the two primer sets will contain different bases in the CpG position. Methylated primers will contain either C or G in CpG locations and non-methylated primers will contain either T or A. The primer set (M or U) that amplifies the target-sequence will inform about the methylation status of that CpG site.
For more information on MSP, see the MSP section of our Bisulfite Beginner Guide.
Successful PCR is Only the Beginning
Congratulations! You’ve used your knowledge of primer design to successfully run a PCR experiment and now you’re ready to use your amplified DNA for downstream experimentation. However, many downstream applications require extremely pure, concentrated DNA that is free of contaminants.
Zymo Research’s DNA Clean & Concentrator Kits were designed to facilitate the removal of salts, polymerases, and endonucleases from your PCR product, leaving you with purified, highly concentrated DNA. The resulting DNA is suitable for even the most sensitive downstream applications including sequencing, cloning, ligation, and endonuclease digestion. Discover which PCR purification kit best suits your research goals today.